Flarum Beta Version: Tutorial from Beginner Installation to Basic Settings
This is a basic tutorial intended only for beginners; experts, please go easy on me. This article mainly covers installation with composer and is not suitable for virtual hosts. Of course, you can also install it locally with composer and then upload it to a virtual host.
Installation Preparation
First, check the server environment. Your server must meet the following requirements:
Web server: Apache (with mod_rewrite), Nginx, or Lighttpd
PHP 5.6+ and these extensions: mbstring, pdo_mysql, openssl, json, gd, dom, fileinfo
MySQL 5.5+
If you are using a VPS built with LNMP, the fileinfo extension is usually missing. Please modify the contents of the include/upgrade_php.sh file yourself, changing
--disable-fileinfoto
--enable-fileinfoThen execute ./upgrade.sh and select 4 to upgrade PHP. For virtual machines, please contact your hosting provider yourself. Linux virtual hosts are generally recommended for installation.
(Update: Starting with LNMP 1.5, there will be a fileinfo switch option allowing you to specify whether to enable it during installation.)
Begin Installation
If you are using the Flarum CV integration package, first extract it and upload it to the website root directory in a ZIP archive, then extract it. For details, see
{cat_insidepost id="116"}
To install the official VPS version, cd to the website root directory and then enter the following (please make sure Composer is installed on your server. Since LNMP includes it by default, this will not be described in detail here):
composer create-project flarum/flarum . --stability=betaAfter completing the steps above, change the permissions of assets/ and storage/ in the website root directory to 777 (if they do not meet the installation requirements, you will be prompted to change them), and then create a new database. Open the website homepage to enter the installation interface directly. Enter Community Name, Database Name, Database Username, Database Password, Database Prefix (recommended to leave blank), Super Administrator Name, Email, Password, and Confirm Password in order, then click Install.

Pretty URL Settings (NGINX)
Modify the nginx.conf file, or configure pretty URLs in one of the various control panels, and add the following content:
location / { try_files $uri $uri/ /index.php?$query_string; }location /api { try_files $uri $uri/ /api.php?$query_string; }location /admin { try_files $uri $uri/ /admin.php?$query_string; }location /flarum { deny all; return 404;}location ~* \.php$ { fastcgi_split_path_info ^(.+.php)(/.+)$; fastcgi_pass unix:/var/run/php5-fpm.sock; include fastcgi_params; fastcgi_param SCRIPT_FILENAME $document_root$fastcgi_script_name; fastcgi_index index.php;} location ~* \.html$ { expires -1;}Email Settings
After successfully completing the installation, first go to Basic Settings to configure the site description and welcome banner, and then, of course, set up email sending; otherwise, how can new users register? (If you are not worried about spambots, you can also enable the user-management user management extension and disable email registration.)
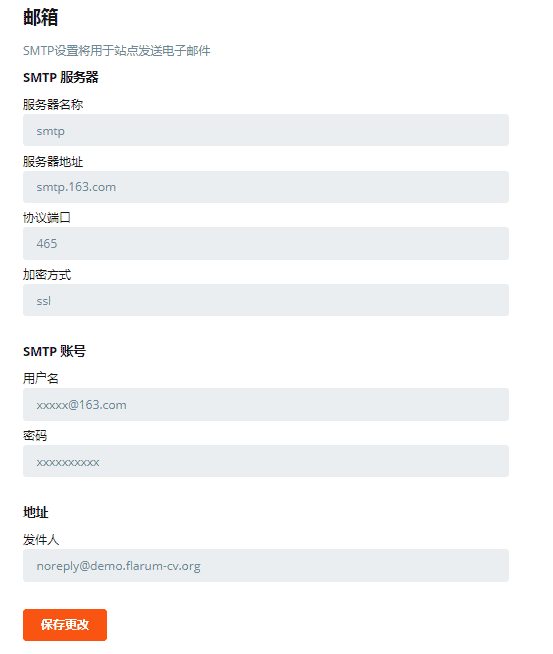
Here, 163 is used as an example for the email settings. In fact, some free overseas email services are recommended instead. Except for the first SMTP field, which is fixed (unless your server provides its own email service, in which case you can use the default mail), modify the remaining settings according to the SMTP settings of your email service provider.
Permission Settings
Here are a few options to pay attention to:
- View User List - This option was added in beta7 and is used to control permission to use search. If set to registered users, guests will not be allowed to search.
- Posts Require Approval and Replies Require Approval - These are two separate options. Configure them according to your needs.
- If you need to restrict the permissions of registered user groups, enable the
Default User Groupextension (included in the CV version). - If you need to set up
Private CategoriesorVIP Categories, add a node, then set viewing permissions for posts to the corresponding user group, and also modify permissions for posting, replying, and so on.
Setting Up Nodes (Sections)

Operation tips: After creating a category, the new category will appear in the tag bar below. To turn it into a node, drag it with the mouse to the node area above. If you drag it below an existing node and to the right, the category will become a subcategory of that node (as shown on the right side of the screenshot); if you drag it below an existing node and align it with the node, the category will become a parent node (as shown on the left side of the screenshot).
Relationship between nodes and tags: In Flarum, nodes are categories (sections), while tags are shared tags. As shown on the left side of the screenshot, selecting Announcements allows you to add tags such as Downloads and Questions; in the screenshot on the right, Announcements can only have a Moderation tag.
This concludes the tutorial.
Comments
(5)有人已经开始使用Flarum beta11了,但不知道如何下载?
教程已写好<a href="https://www.ikxin.com/381.html">https://www.ikxin.com/381.html</a>
老哥,请问你的邮箱配置后生效了吗?我的配置完成注册时总是提示网络不太顺,请稍后再试。
如果保证邮箱配置是正确的,还是无法注册的话,查看一下/storage/logs目录下是否有报错日志
不错不错