Last week, while U-File was open for registration, I signed up for an account and got a space with unlimited storage and 2 TB of traffic for free. After waiting a long time, the account finally passed review. I took a look at the console and found that it should be using Upyun Object Storage. I tested several tools provided by Upyun, and they all worked normally.
The only slight regret is that Upyun Object Storage does not yet support mirror back-to-origin. Strangely enough, the object storage services of the three major providers—Alibaba Cloud OSS, Tencent COS, and Baidu BOS—as well as smaller providers such as Qiniu Cloud, all support mirror back-to-origin, yet Upyun has not followed suit.
Since mirror back-to-origin is not supported, and I needed U-File to accelerate my image hosting through mirroring, I had to adopt another solution. So I found the UPX command-line tool in Upyun's documentation. It includes a sync command that can synchronize a local path to Upyun Object Storage. Although this cannot implement mirror back-to-origin, the data in cloud storage can stay synchronized with the local data, which can also be considered another form of mirroring.
Project Introduction
UPX is a command-line cloud storage management tool designed specifically for developers. It supports file uploads and downloads, incremental file synchronization, directory creation and deletion, file deletion (including asynchronous batch file deletion), and more.
Open-source project: https://github.com/upyun/upx
For a detailed introduction, see the project's README
This article mainly explains how to use upx on CentOS to synchronize local files to Upyun Object Storage.
Installing UPX
# 64 位系统下载
wget -O /usr/local/bin/upx http://collection.b0.upaiyun.com/softwares/upx/upx-linux-amd64-v0.2.6
# 32 位系统下载
wget -O /usr/local/bin/upx http://collection.b0.upaiyun.com/softwares/upx/upx-linux-386-v0.2.6
# 给予权限
chmod +x /usr/local/bin/upx
After installation, you can directly enter upx to check whether the installation was successful.

Command Introduction
All commands support
-hfor viewing usage instructions.
| Command | Description |
|---|---|
| login | Log in to Upyun Object Storage |
| logout | Log out |
| sessions | View all sessions |
| switch | Switch sessions |
| info | Display information such as the service name and username |
| cd | Change the working directory (enter a directory) |
| pwd | Display the current directory |
| mkdir | Create a directory |
| ls | Display information about files and directories in the current directory |
| tree | Display the directory structure |
| get | Download a file or directory |
| put | Upload a file or directory |
| rm | Delete a directory or file |
| sync | Incrementally synchronize directories, similar to rsync |
| auth | Generate an auth string containing the space name, operator, and password |
| post | Submit an asynchronous processing task |
| purge | Submit a CDN cache refresh task |
| global options | Description |
|---|---|
| --quiet, -q | Do not display information |
| --auth value | auth string |
| --help, -h | Display help information |
| --version, -v | Display the version number |
Logging In to Upyun
Enter the upx login command, then enter the service name, operator, and operator password in sequence and press Enter to log in. Seeing Welcome to indicates that the login was successful.
You can enter upx info to view information. CurrentDir is the current directory, and Usage is the used storage space.

UPX also supports logging in to multiple accounts. You can use upx sessions to view all login sessions and upx switch to switch between sessions. Since I do not have any additional accounts, this will not be demonstrated here.
Synchronizing Files
First, use cd to open the directory to be synchronized, then use upx sync to perform the synchronization.
For example, if I enter upx sync 2020/ /2020/, it synchronizes the 2020 folder in the current directory to the 2020 folder under the root directory in Upyun Object Storage.

After synchronization is complete, the above message will be displayed. Connect to U-File using an FTP tool, and you can see that the 2020 directory has been synchronized in its entirety.
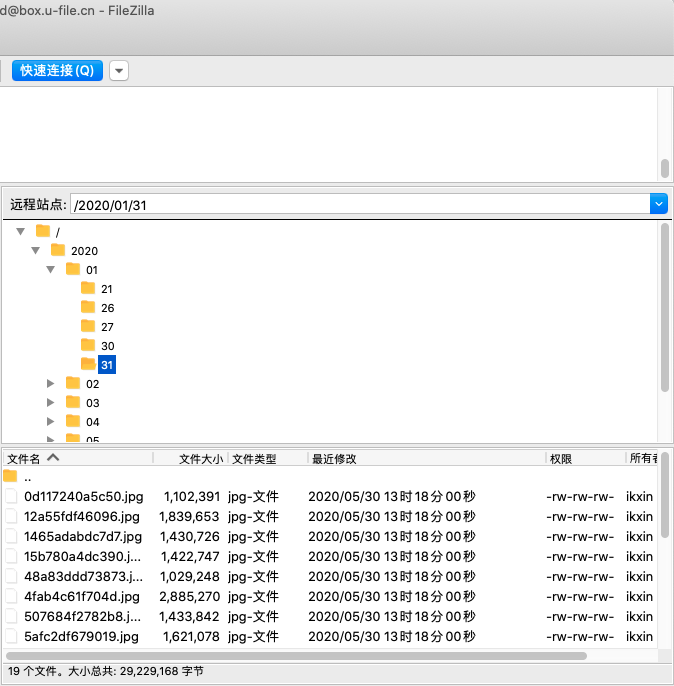
This method can also be used to synchronize the static resources of other website applications.
WordPress
upx sync wp-content/uploads/ /wp-content/uploads/
Typecho
upx sync usr/uploads/ /usr/uploads/
Flarum
upx sync public/assets/ /public/assets/
Never synchronize the website's root directory directly, because the root directory may contain configuration files such as WordPress's wp-config.php, which contains important information such as database details. Once uploaded to Upyun Object Storage, these files can be downloaded by anyone, seriously compromising security.
Scheduled Synchronization
Currently, upx sync uses incremental synchronization and does not yet support real-time synchronization, so scheduled tasks are the only way to implement periodic synchronization.
Here, I use the scheduled task feature of the Baota Panel, which is somewhat simpler to use than Crontab.
Note that when executing upx sync in a scheduled task, you need to change the synchronization directory to one whose root is the system root directory.

I set it to synchronize once per minute. After one minute, I checked the log and could see that the synchronization was working normally.
+=============+=========+===========+================+===========+=============+
| SYNC_EXISTS | SYNC_OK | SYNC_FAIL | SYNC_NOT_FOUND | DELETE_OK | DELETE_FAIL |
+-------------+---------+-----------+----------------+-----------+-------------+
|         571 |       0 |         0 |              0 |         0 |           0 |
+-------------+---------+-----------+----------------+-----------+-------------+
----------------------------------------------------------------------------
★[2020-05-30 13:50:04] Successful
----------------------------------------------------------------------------