Detailed Installation Tutorial for PHP Lightweight Community Flarum Beta 11
Flarum released version 0.1.0-beta.11 a few weeks ago. See Flarum 0.1.0-beta.11 Released for details. So let’s take a look at how to install this version from scratch. The previous article already covered installing Composer and switching to a domestic mirror, so the following steps are very easy.
Preparation
My test environment is as follows:
Apache 2.4PHP 7.3MySQL 5.6The server requirements in the official documentation are:
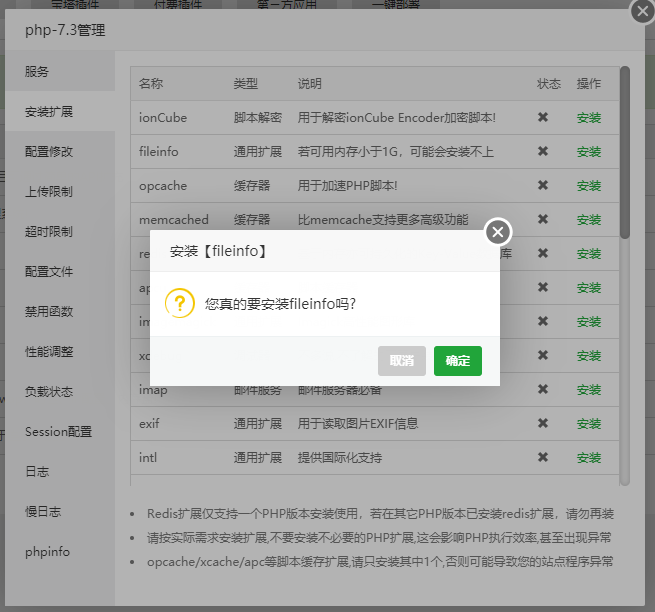
Apache (with mod_rewrite enabled) or NginxPHP 7.1+ with the following extensions: curl, dom, gd, json, mbstring, openssl, pdo_mysql, tokenizer, zipMySQL 5.6+ or MariaDB 10.0.5+SSH (command-line) access to run ComposerThe official documentation does not seem to mention one important extension: fileinfo. This extension is required by Flarum and can be installed directly through the BaoTa panel, which is very simple.
If the available memory is less than or equal to 1 GB, the installation may fail. In that case, you need to add swap memory to ensure that the installation succeeds. I will not go into detail about how to add it; the Linux Toolbox in BaoTa has the relevant option.
Create a new site. It is recommended to choose utf8mb4 for the database encoding, although utf8 works as well.

First, let me mention something that was not covered in the previous article. I encountered many warnings while using Composer, such as the following:


According to the warnings, the relevant functions were probably disabled by BaoTa’s default PHP configuration. I summarized them, and the functions that need to be removed are as follows:
putenvpcntl_signalproc_openStart Installation
First, cd to the website root directory and run rm -rf * to delete all files.

Well, I tried it, and rm -rf did not delete everything. It is better to delete them using the file manager in the BaoTa panel. .htaccess and .user.ini must also be deleted to ensure that the directory contains no files. Then install directly using Composer:
composer create-project flarum/flarum . --stability=betaThe installation will be complete after a while. Do not rush to access the site yet; first install a Simplified Chinese plugin:
# 繁体中文composer require csineneo/lang-traditional-chinese# 简体中文composer require csineneo/lang-simplified-chineseThen change the permissions of all directories and files under the website directory to 755, and point the website root directory to /public.


You can now access the website!


Comments
(29)你好,安装好之后管理页面404怎么办呢?
伪静态没设置
我和你一样,也是404
伪静态设置好了,也不行。
环境是apache还是nginx
nginx
应该可以的
::aru:shy::
::twemoji:smile::
在哪里可以下载到完整版呀? ::aru:shy::
使用命令 ``` composer create-project flarum/flarum . --stability=beta ```
楼主,有中文翻译吗
网站根目录运行 <pre> //繁体中文 composer require csineneo/lang-traditional-chinese //简体中文 composer require csineneo/lang-simplified-chinese </pre>
这个不太懂诶
你装好flarum没
嗯
用ssh连接上你的服务器,cd打开flarum根目录,输入 <pre> composer require csineneo/lang-simplified-chinese </pre> 然后回车安装简体中文插件
站长能加一下你QQ吗?方便联系,有些问题不太懂 ::twemoji:smile::
我的主页有写 https://www.ikxin.com/cross.html
按照您的操作完成后网站打不开
什么问题
谢谢大佬,已经解决了 ::aru:proud::
按照https://bbs.stkey.top/d/216-%E4%BB%8B%E7%BB%8D-flarum/3
按照什么?
不错,准备去搭一个试试,谢谢分享
老哥,你的服务器买的哪的啊,感觉挺快
我用的是景安郑州的云服务器
太赞了,我这个小白终于知道怎么安装了,Thanks
客气了哈哈